


หลังจาก login เข้าระบบจัดการโฮสแล้ว ให้ดูที่
Advanced Features
ที่เมนู Softaculous Auto Installer จะสามารถเข้าไปลง ระบบต่างๆ สามารถเลือกลงได้เลย
…หากเราอยากลงไว้ใน Subdomain เช่น ชื่อที่ตั้ง.ชื่อเว็บไซต์ของเรา.com
เราต้องสร้าง subdomain ก่อนที่ หัวข้อ Your Account เมนู Subdomain Management
…ไม่ยากครับ ลงง่ายๆ ไม่ต้องสร้าง database ระบบจะสร้างให้เอง พร้องส่งรายละเอียดให้
เราแค่ตั้งชื่อ database ครับ


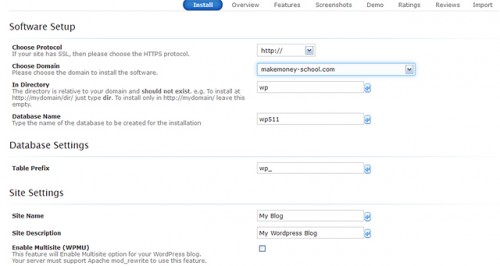
Choose Protocol
If your site has SSL, then please choose the HTTPS protocol.
ปกติให้เลือก http://www. ถ้า subdomain ก็ http://
Choose Domain
Please choose the domain to install the software.
เลือกโดเมน หรือ subdomain ที่ต้องการลง
In Directory
The directory is relative to your domain and should not exist. e.g. To install at http://mydomain/dir/ just type dir. To install only in http://mydomain/ leave this empty.
ว่างไว้เลยครับ
Database Name
Type the name of the database to be created for the installation
ใส่ชื่อ Database เราตั้งชื่อขึ้นมาใหม่ได้เลย
Database Settings
Table Prefix
wp_ คำนำหน้าตารางข้อมูลนี้เป็นค่าเริ่มต้นของระบบ ไม่ต้องเปลี่ยนแปลง
Site Settings
Site Name ตั้งชื่อเว็บ ค่อยมาเปลี่ยนที่หลังได้
Site Description
คำอธิบายรายละเอียดเว็บ
Enable Multisite (WPMU)
This feature will Enable Multisite option for your WordPress blog.
Your server must support Apache mod_rewrite to use this feature.
ติ๊กเครื่องหมายได้เลย เป็นผลดี
Admin Account
ตั้งขึ้นมาครับ เอาไว้ใน login wordpress
Admin Username
Admin Password
Admin Email ใส่ e-mail เวลาลืมพาส เราสามารถสั่งให้ระบบส่งพาสใหม่ไปให้ได้
Choose Language
Select Language เลือกภาษา ภาษาไทยก็มีให้เลือก จะเป็น wordpress ที่มีรูปแบบเมนูเป็นภาษาไทย
Install …เสร็จครับ รวดเร็วมาก ไม่มีอะไรยุ่งยาก
ถ้าสนใจลองดูนะครับ ไม่ยาก ถ้าอยากเข้าใจละเอียด ลองดูที่หัวข้อการลงแบบติดตั้งเอง เสริมดูนะครับ
จะทำให้เข้าใจมากขึ้นได้ http://www.makemoney-school.com/howto_wordpress.html